Upcoming Events that you DON'T want to miss!!

Showing posts with label 12x12 layout. Show all posts

Friday, May 10, 2013

Using Coordinated Collections - A Challenge

Happy May, Ladies!

How many of y'all made it to the Gulf Coast Crop and Shop weekend in April? I was able to go for a few hours on Saturday and was impressed with how creative you ladies are. Well done! While I was there, I picked up some fun new Basic Grey papers and stickers to play with. There are times when I want to mix and match patterns and manufacturers. There are times I want to be artsy and make my own backgrounds and embellishments. And then there are times that I want quick and easy. I don't want to think about whether this paper matches that paper. I just want to grab supplies and pictures and create. The easiest thing to do at these times is to use products from a single manufacturer. Scrapbooking companies spend many hours designing and producing lines that coordinate. They WANT to make this easy on us. They WANT us to be able to use their papers and letters and stickers and stamps all together. That is their goal! And sometimes, that is exactly what I want, too.

The line that I brought home to play with was Basic Grey's new Bowties line from their winter CHA release. They had several bright and happy lines this release, including Hipster, Bowties, and Kneehighs, but this is what I chose to play with. All the supplies coordinate. All the supplies are colorful. All the supplies begged me to play with them. All I added to my layouts was some cardstock, ink, and miscellaneous bits and pieces. Everything else came from the Bowties collection.

My challenge to you this month: Choose a line of products that you like. Pull out 3-4 papers from that line, plus some coordinating embellishments, and create a layout (or card or whatever project that you are inspired to make). You may add whatever supplies you want to your project. Post a link to your project here or to the ScrapHappy Facebook page before June 3, and Christy will randomly choose someone to win a $5 credit to the store to spend however she wants!

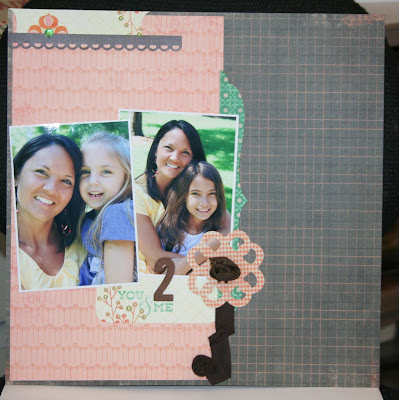
This first layout, I added washi tape and a printed label from Studio Calico. The journalling block was actually packaging from the Basic Grey enamel dots, and the letters were cut from one of the papers in the collection.
 I only added cardstock to this second layout.
 On this last layout, I added cardstock, washi tape, thickers, more label stickers, and some stitching (a friend loaned me her new Amy Tangerine stitching template, so I was experimenting and playing...highly recommend this product...so...much...fun...).
So...are you ready? Then run grab your collection of papers, get set, and GO!!! I look forward to seeing what you create!

Supplies:
- patterned paper, stickers, brads, enamel dots, transparent frames - Basic Grey
- washi tape - Doodlebug, Hambly
- label stickers, thickers - Studio Calico
- stitching template - Amy Tangerine
- cardstock, stamping ink, bubble wrap/dots stamp

Thursday, April 18, 2013

A Winner, A Challenge, and A Question

Hello, Ya'll!

I have a quick apology to make to everyone. This month has been crazy, insanely busy, so my blog post is running a bit late, which means that I still need to announce the March challenge winner. Please forgive my tardiness.

And now, without further ado...the March winner is...SHARON HUNT! Congratulations! You have won a $5 credit to Scraphappy to spend any way your heart desires! ENJOY!!!

This month's challenge: Use divided page protectors (also known as Project Life, Photo Pocket Pages, etc) to make a layout on any topic you want. You can use any configuration you want and use any papers and embellishments that you want. Scraphappy has a great selection of various configurations available for you to play with, so if you need some, go get them!
Ready? On your mark...Get set...GO!!!

Next, a question for you Lovely Ladies (and any Handsome Gentlemen) who are reading this blog today: I am teaching a beginning Silhouette class at next weekend's Gulf Coast Crop. Do you have any specific topics or questions that you want me to address? What do you want to learn about? Please, let me know. I am still working on my handout, so I can add anything that you want to know.


Thursday, March 7, 2013

Scrapper's Block

How many of you have experienced 'Scrapper's Block?' It's frustrating; it's annoying; and it takes up valuable time that could otherwise be spent creating. I've been experiencing a serious block recently. I stare at my stash and my photos. I think about my stash and my photos. I sit down with my stash and my photos. And yet, I cannot come up with an idea or plan for what I want to do.

So what to do when you hit a creative wall? Look for inspiration. Inspiration is all around us: on-line, magazines, nature, God's creation, the smiles and laughter of our children, our own scrapbooks and history. Typically, when I am having trouble creating, I can take a walk with my camera, capture some of our beautiful world, and come back home inspired. Sadly, that did not work for me this time. So what did I do? I went shopping.

I found this adorable, trendy stamp set from Lawn Fawn at ScrapHappy, and I thought that it would be perfect for helping me get through this block. It is fun and is a chevron pattern that I frequently use when I choose patterned papers. Slowly but surely, I am working through my block. I have made a few layouts with this stamp set this week, and although they aren't my favorites, they are still documented memories that I can add to my albums, and I know that I will be able to enjoy this toy for many years to come. So without further ado, this month's layouts:

This month's challenge is to pull out your stamps and use them to scraplift yourself. Look through your scrapbooks. Enjoy your memories. Use them to generate new projects. To be eligible for this month's prize ($5 store credit!), upload your project to facebook and tag Scraphappy on your project. A winner will be randomly drawn and announced in my April post.

And finally, last month's Challenge Winner: Jessica Gabe! Thank you to all who entered and played along.  Jessica, next time you are in ScrapHappy, you have $5 credit to spend however you desire in the store!

Supplies:
- patterned paper - Echo Park, Studio Calico, Lily Bee
- thickers
- enamel dots - My Mind's Eye
- chipboard stars - Pink Paislee
- stamps - Lawn Fawn, Kelly Purkey, and Studio Calico
- wood veneers - Studio Calico
- puffy stickers - Amy Tangerine
- stamping ink and embossing powder
- washi tape

Tuesday, January 8, 2013

Wood Veneers - What Do I Do With Them?

Happy New Year, World!

I hope you all had a very safe and fun New Year's holiday this year, and that you had time to spend on our beloved Crafty Hobby! This month I decided to talk to you about wood veneers. Have you seen them online or in the store? Do you wonder what you're supposed to do with them? I mean, they're cheap. They're cute. They come in many imaginable shapes. And they're little (usually). So what is their purpose? Why are so many manufacturers making them? Why are they so popular? Well, lucky for you, I have an answer: They're FUN. They're CUSTOMIZABLE. They MAKE A BIG IMPACT on your project. Want to see a few examples?

First up: Use them straight out of the package, just as they are. No altering. No fussing. Just adhere and go (a little tip: glue dots and liquid glues like Glossy Accents work best). 
2. Emboss: Cover the surface of your wood veneer with versamark or other embossing ink, sprinkle on the embossing powder of your choice, heat with a heat gun, and watch the magic occur!
 3. Colorize with your favorite ink or cover with glitter. In this next layout, I altered the veneers with Tim Holtz Distress Stain, let them dry, then covered them with a thin layer of Rock Candy Distress Stickles.


4. Stamp on them.
5. Paint them.
6. And most importantly, come into Scraphappy and find the inks and paints, glitter, and embossing powders you want to play with, pick up some wood veneers, go home, use your imagination, and HAVE FUN!!!

Supplies:
Patterned paper - Basic Grey, Simple Stories, KI Memories, Heidi Swapp
Cardstock
Spray ink - Studio Calico, Heidi Swapp
Mask - Studio Calico
Rhinestone stars - Jenni Bowlin Studios
Wood veneers - Studio Calico
Letter stickers - Heidi Swapp
Stamps - Studio Calico, Technique Tuesday
Embossing powder
Stickles
Distress Stain
Stamping ink - red, green, Versamark
Washi tape

Tuesday, October 2, 2012

Using Up Your Leftovers

When you scrapbook, what do you do with your leftovers? Do you put them away? Do you slide them to the side of your desk to think about later? Do you add them to a pile? Or even better, do you actually use those little bits and pieces? If you were to see my desk, you would know that I am an infrequent scrap cleaner. I tend to push my leftovers into a pile and stack them up until I can't stand it anymore and decide to do something with them. Often, this means that I will compile these pieces into layouts and combinations I never would have planned for if I had thought ahead. So what do I do? I go to Scraphappy, pick up 2 or 3 pieces of patterned paper, some letter stickers (especially Thickers...I am on a serious Thickers kick lately), and combine that with what's on my desk to make some layouts. And the Bonus? My desk gets cleaned off without any effort!

For my first layout, I used Studio Calico and Lilly Bee papers that I already had, combined with the teal thickers and butterflies that I got at Scraphappy. The leftovers? The Amy Tangerine stickers and teal woodgrain washi tape.

This next layout uses some new Shoreline papers as a background, combined with leftover Amy Tangerine stickers, an Amy Tangerine pocket, Shoreline sunburst scraps, and Heidi Swapp banner pieces cut off from a previous project. The hexagons are from a Studio Calico stamp set and are attached with some brads I found in my drawer.


The only new item on this final layout is the background paper and the teal letter 'P.' Everything else on this page was leftover. The light blue strip of Shoreline with the hot pink splatters? Leftover from the Baby Turtles layout. The My Mind's Eye transparency? Scavenged from my Valentine's Day memo board. The Heidi Swapp disco heart? The last of a package from this past spring.


So what have we learned today? Use your stash! Use those bits and pieces of scraps. Use pieces from different manufacturers and product lines to make your own combos. Need some patterned papers, letters, or cardstock to pull it all together? Head on in to Scraphappy and buy what you need! It's all there!

Tuesday, September 4, 2012

End of Summer with Shoreline

Hello World!

How was your summer? Any days at the beach? Any fun travel? Any good family time? Any time to play? And now the important question...Any time to scrap? The last time I was in the store, Christy gave me some of American Crafts' Shoreline papers to play with, and WOW, they are perfect for bright, happy summer events (or anything else bright and happy you may want to use them for). The colors are uber-saturated reds, blues, and yellows with some dark hot pinks and pool blues to accent. I have had the most fun scrapping with these papers, hoarding every little bit and piece to tuck here and there as color bursts on other projects.

I was blessed this summer with the opportunity to go with my father on a medical mission trip to Peru. At the end of the trip, we spent a day touring Machu Picchu. The Shoreline bright yellow sunburst pattern screamed 'Incas' to me, so I used it as the background for this layout about how much we climbed that day. I used some old kokopelli stamps I had in my stash to stamp on some canvas in teal, then stamped the words in black over the person kokopelli. I added some Mini Market letters from October Afternoon and some brads to finish off the page.
This next layout is about a shopping excursion I took with my daughter last month. We were separately scavenging a clothing store for clothes to try on. When we met up in the dressing room, we had both picked the same dress! Obviously, as a scrapbooking mom, this had to be documented on my cell phone so a layout could be made. If you look at the layout, and think about my typical style, you'll notice that I am a B-side scrapper. I prefer the backsides to most patterned papers. They tend to be more subtle, less busy patterns that recede into the background more than their typical trendier, bolder A-sides. This shopping layout uses almost all B-sides.
And then we come to my last layout for today. I made the background of this layout by spraying various colors of yellow and green spray mist onto shiny white cardstock then blending them with a paper towel. The sunshine embellishments were cut out from a separate sheet of Shoreline paper, as was the strip at the bottom and the 'sunshine' label.
I hope you've been inspired to pull out your summer pictures and spend some time creating. If you want any of the Shoreline papers, go see ScrapHappy and stock up! I think I might be needing some more for my own stash...Maybe I'll see you there?

Supplies:
- American Crafts - patterned paper, Thickers
- letter stickers - October Afternoon, Lily Bee Studios
- spray mists - Studio Calico, October Afternoon, Tattered Angels
- disco starts - Heidi Swapp
- wood veneer stars and camera - Studio Calico
- chipboard stars, brads, teal stamping ink, canvas fabric

Tuesday, August 7, 2012

How Do I Use Holiday Supplies When It's Not That Holiday?

Hello World!

Another month, another blog post from me! Or 2 or 3, as the case may be this month, since I found myself with an abundance of layouts I have made this summer for Christy that I have not yet shared with you ;) Today we are going to talk about using those cute themey supplies for uses that have NOTHING to do with the theme. Sacriledge, right? I know. I know. We buy the cute themed supplies BECAUSE they fit the theme we want to work with. But what do we do with the leftovers after we have scrapped the theme??? We use them anyway!

How many of you have actually scrapped your July 4 pictures from this year? And how many of you have leftover 'July 4'-specific supplies left? Or you just love the red, white, and blue combo and want to use it over and over again? Today's layouts feature some Pebbles July 4 papers that I found at ScrapHappy but decided to use for several non-holiday pages. Honestly, I haven't even printed my July 4 pictures yet, but I knew I wanted to use the papers NOW, so I used photos I already had printed.

The first layout actually doesn't even have pictures at all. Many of you know my family went on a Great American Road Trip last summer. One entire month of seeing our beautiful country. Since then, I've been scrapbooking our trip. I have already filled an entire album (I file all my pages chronologically. I scrap whatever inspires me on any given day, but then I put them in albums by date), so I decided I needed an official Title Page to separate this section of layouts from the rest of my pages. I've been pondering a Title Page for months, and when I saw this United States map paper, I knew I had found the perfect background. Since this is a 'busy' paper, with lots of graphics that I wanted to use, I opted to focus on the map and not use photos at all. Instead, I put brads and star stickers on the locations we focused our trip around and connected them with string. Next to each brad, I wrote the location and sight seen there (ex. Mt. Rushmore in Rapid City, South Dakota).  I inked and glued the bar code strips from the collection as my accent papers, and used Studio Calico wood veneers to indicate our family and method of travel.


This next layout features the entire Pledge of Allegiance. I didn't want to obscure the words, but I still wanted to use the paper for a traditional layout. I used a small Instax photo I took of my Niecelets together in Tennessee and added small embellishments on the diagonal. I wanted to emphasize certain words in the Pledge, so I highlighted them with Stickles. I'm not sure I'm thrilled with the results, but I wanted you to know why part of the layout sparkles and why part of it doesn't. Lol.


My final layout for today uses some of my favorite Disney pictures from this past Spring Break. We were fortunate to be there when the 'new' Dumbo in the Fantasyland expansion had just opened. My Girls rode late at night (no lines then) while I took pictures. When I saw the photos on my desk next to these Pebbles papers, I knew they were made for each other.
I hope I've given you some ideas on how to use your holiday papers for non-holiday layouts. From photoless pages, to tiny pictures, to Disney, I hope these inspire you to pull out some of your leftover supplies (or go buy more supplies!)  and make pages to be proud of.

- Cori

Supplies:
- patterned paper - Pebbles
- cardstock - Bazzill
- letter stickers - October Afternoon, Jenni Bowlin Studios
- wood veneers - Studio Calico
- transparency - Hambly
- Disco Stars and Instaframe - Heidi Swapp
- shaped paper clips - Amy Tangerine
- Distress Ink
- number stencil, brads, thread, white Uniball journalling pen

Friday, June 1, 2012

New Heidi Swapp - Some Layouts to Share

I went to Scraphappy last week and was delighted to find the new Heidi Swapp line had come in. I immediately 'claimed' some of the papers and embellishments as mine to play with. Here is what I came up with: The first is what you're used to seeing from me. The second...well, let's just say I've been hanging around a certain other Design Team member/friend a lot lately, and she's rubbed off on me ;)

Supplies:
- patterned paper - Heidi Swapp, My Mind's Eye
- letter stickers - Heidi Swapp (neon), Sassafrass (blue)
- banners, word stickers, epoxy embellishments, label stickers - Heidi Swapp
- date stamp
- Stickles
- brads

Thursday, May 3, 2012

Recycling on Your Layouts

I don't know about you, but I'm always looking for ways to save money. One of the ways I do this is by reusing items in my home as often as I can, especially in my scrapbooking and memory keeping projects. And I don't know if you knew this, but this coming Saturday is National Scrapbooking Day - a whole day dedicated to this hobby we love. To combine the two interests (recycling and scrapbooking), Christy gave some old books of upholstery fabric swatches to Ashley Horton and me and asked us to make flowers out of them. If you are coming to the store's crop on Saturday, you might find a few of these flowers lying around (hint hint hint)...and if you're not coming, then you'll just have to settle for looking at my pictures here on the blog.

First up: My Supplies...fabric swatches, my BigShot (Any manual die-cutter will work. You just need to adjust the thickness of your cutting pads to account for the fabric and whatever dies you are using), flower or scalloped-circle dies (I used Spellbinders Nestabilities), and brads, stitching, Glubers, or whatever else you want to hold your flowers together (I used brads. Ashley finished others with stitching and other decoration, but you'll have to come to the store Saturday to see hers!)


When you cut your flowers, try to put your dies as close together as possible so you can get several flowers out of a single swatch.

Once you've cut your flowers, take them to your desk and find some supplies and a photo to match (Sorry the photo is sideways. My computer is refusing to rotate my pictures today).
One item I found on my desk is some leftover embellishment packaging. Seriously, how awesome are those acrylic casings that embellishments come in? I save nearly all of them. What can you do with them, you ask? So many, many options. You can stamp on them with staz-on ink (so you can move a stamped image around on your page and not worry about 'messing up' the page). You can die-cut them and make clear embellishments (Anybody remember Heidi Swapp's old Ghost shapes? Now you know how to make your own!). Or you can adhere other embellishments to them to use as a shiny, clear background (like I've done here with some My Mind's Eye embellishments).
And here's how I put it all together. In addition to the fabric flowers and clear packaging (sorry about the glare), I also used the B-side of a product code strip from a piece of patterned paper on this layout. So many recycled bits and pieces on here. Makes me happy.
I hope I've given you some ideas on how to recycle and save some money on your projects. Please feel free to put a link in the comments to any projects you may make using these ideas. And don't forget to enjoy National Scrapbook Day!

Supplies: fabric, Big Shot die-cutter, Spellbinders nestabilities, brown ink
- patterned paper - Dear Lizzy, Studio Calio, Echo Park, Lilly Bee
- letter stickers - Studio Calico
- brads - Bo Bunny
- washi tape - Hambly
- 'jeweled' frame - My Mind's Eye
- butterfly stickers - Studio Calico
- staple - Tim Holtz
- yellow acrylic heart - Heidi Swapp

Thursday, April 5, 2012

Playing with New My Mind's Eye

Hello, World!

It's the first Thursday of the month, which means it's time for my regularly-scheduled blog post! I know you've all been waiting with baited breath, right? Lol.Anyhow, I hope everyone has had a chance to check out the new store location. Personally, I love it. It's closer to my house, it's well-stocked, and it's closer to my house (have I mentioned this already?) - which means more opportunities to shop and buy all the new products that are coming in. Remember all those lovely pictures I showed from CHA in January? Well, I have good news for you: the Winter CHA releases are starting to hit store shelves! And ScrapHappy has a lot of it! Yeah for enabling! When I was there last week, I was able to pick up some of the new Basic Grey and Echo Park lines, in addition to some of Rhonna Farrer's lines for My Mind's Eye.

First up, a few layouts for you to look at: Baa Baa Baby Jesus is a layout about my youngest and her friends before they sang in our church's Children's Christmas Program and the sheep song they sang. I wish I could convey the hilarity of their performance. But at least I have this layout to remember it by.

This next layout uses a quote from Dr Seuss. October Afternoon offered the quote as a free Silhouette svg file for easy cutting. I stamped the butterflies with a Jenni Bowlin stamp then layered the quote over it. The people shapes are Studio Calico wood veneers, and the kitty button is from October Afternoon.

 And finally, a new magnet board that can be used for everyday messages and note-taking. I cut the days of the week on my Silhouette and inked them with grey ink before Mod-Podging them to the board. The magnets themselves are recycled from my Love Notes magnet board that I showed you at Valentine's Day. All the supplies are available at ScrapHappy.


I hope you've enjoyed the projects today. Let us know if you have any requests or questions.
- Cori

Friday, February 10, 2012

Love Notes, Part 2 - A Layout

Hello, World!

Yesterday I showed you a memo board project using some My Mind's Eye Lost and Found papers and embellishments. Today I'm going to show you what I did with my remaining bits and pieces from this line. Since I am a Layout Girl at heart, and I don't like tossing or wasting any little bits of scraps, I decided to make a layout.

Do you remember how I had cut my title on my Silhouette? Well, that negative space cutout called to me, and I decided to write a Love Note to my oldest daughter. I used the cutout title as a mask to spray a title onto a free-hand cut heart from yesterday's leftovers using some Tattered Angels spray mists. I emphasized the title by tracing over it with some Smooch ink to make it more legible. I then layered my heart with my photo and some other scraps to make this quick and easy layout. My journalling is on a tag that I also decorated with scraps before tucking it behind my photo.


Thanks for being here and for checking in on the blog!as always, please leave a comment if you have any questions, requests, or thoughts you want to share!
- Cori

Sunday, June 27, 2010

more My Minds Eye

Here are a few more projects
using the My Minds Eye
"So Sophie" lines.
I'll have them in the store
this week, for those that want
to see them in person.
I had a hard time getting a picture
of the round, scallop layout.
It is NOT adhered to the background paper.
The layout is simply the circular, scallop paper.

Hope you're all having a great summer!!

Saturday, June 12, 2010

new My Minds Eye

*warning ~ picture heavy post*

So Christy is in Mobile today
for a Crop for a Cure.
If I'm not mistaken,
she took these lovely new
My Minds Eye products with her.
BUT..................................
you WILL want to come to the store
& see them in person.
TONS of great papers & embellies to match.
PLUS, most of these papers
go super-duper great with
the last My Minds Eye "Quite Contrary" line
& the last Cosmo Cricket "Jolly by Golly" line.

She's also not opposed to making up quick layout kits.
So, if you like any of these projects,
& want her to put the items in a baggie
for you to replicate for yourself,
just give her a call or email & she'll have it ready!!
NOW, how's that for customer service:)

You can see how this first line
reminds me of Christmas.
BUT, it can definitely be used for other things.

This next line has great colors,
including a beautiful brown, peach, orange,
blue, tealish green & creme.

There are a total of 4 lines,
I'm only showing 2 of them in this post.
I know some of the other dt gals
are working with the other lines,
so be on the look-out for them.
One is definitely all man/boyish
& the other has pretty purples & golds.
Happy Scrapping!!

Saturday, April 24, 2010

My Minds Eye layouts

Hasn't today been the best
scrappin' day ever!!
Here's a couple of layouts
I made using more My Minds Eye.
I know you're probably getting sick
of seeing this line,
BUT,
there's so many possibilities.
I actually got to make a "boy" layout:)
I watch a friend's boy on Friday's,
so I enjoy getting some action shots.
Supplies: My Minds Eye "Jack & Jill" papers, sticker quote & Lush red alphabet letters


Supplies: My Minds Eye "Mary Mary" papers; Lush red alphabet & brads; Fiskar border punches

On my blog, I have close-ups
of the clouds on the "superman" layout
& the layered flowers on the "french braid" layout.
I will say I have 3 more sheets of the
Jack & Jill and Little Boy Blue.
Sooooooooooooooooooooo,
that means you'll see, at least, one more project!!