Upcoming Events that you DON'T want to miss!!

Wednesday, April 24, 2013

Simple Stories Vintage Bliss


I love the Simple Stories Vintage Bliss paper pad and find it to be inspiring.  I was not planning on doing another blog post, but the idea for this card just came to me, so here goes:

The paper with the alphabets reminded me of an artist trading card already decorated, so I cut the paper to 2 1/2 x 3 1/2, which is the size of an artist trading card.  I added some of the pretty paper from the Simple Stories Vintage Bliss pad, some pearls, washi tape, and twine with the Lawn Fawn Many Thanks stamp set.  The one thing I would add to the twine is a button.  I think that would add that little extra something special. 


The sentiment, "Thank you from the bottom of my heart," truly states how I feel.  I wish to thank you all, from the bottom of my heart, for your thoughts and prayers.


Supplies:
Simple Stories - Vintage Bliss 6 x 6 Paper Pad
Lawn Fawn - Many Thanks
Ranger - Archival Ink - Jet black
 Washi tape


Sunday, April 21, 2013

Why Use Divided Page Protectors?

Greetings and Salutations!

How many of you have heard of Project Life or have wondered what to do with those lovely divided page protectors that Scraphappy carries? According to Becky Higgins (www.beckyhiggins.com), Project Life can be anything you want it to be. Some people use it as a photo-a-day project. Some people use it to document weeks at-a-glance. Some use it to corral all the stuff of life that accumulates in our homes. But me? I use it to help with my everyday stories and to include more photos from my travels. Some people choose 'only' Project Life or 'only' traditional layouts. I do both. I use the divided page protectors to include more pictures in my albums. Say you print 6 pictures of an afternoon at the beach but then only use 2 of them on your layout. What are you going to do with the extras? Sure, you can make more layouts, but if you're like me, you can only bear to scrap so many beach layouts. Or penguin pictures. Or Christmas pictures. Or birthday party pictures. Or...you get the idea. So what do I do? I scrap those 2 photos on a traditional layout, then I slide the other 4 photos into divided page protectors. If there are more photo sleeves than I have photos, then I pull some of my supplies (scraps and 6x6 paper pads work great for this) and make a mini-canvas to fill in the blocks.


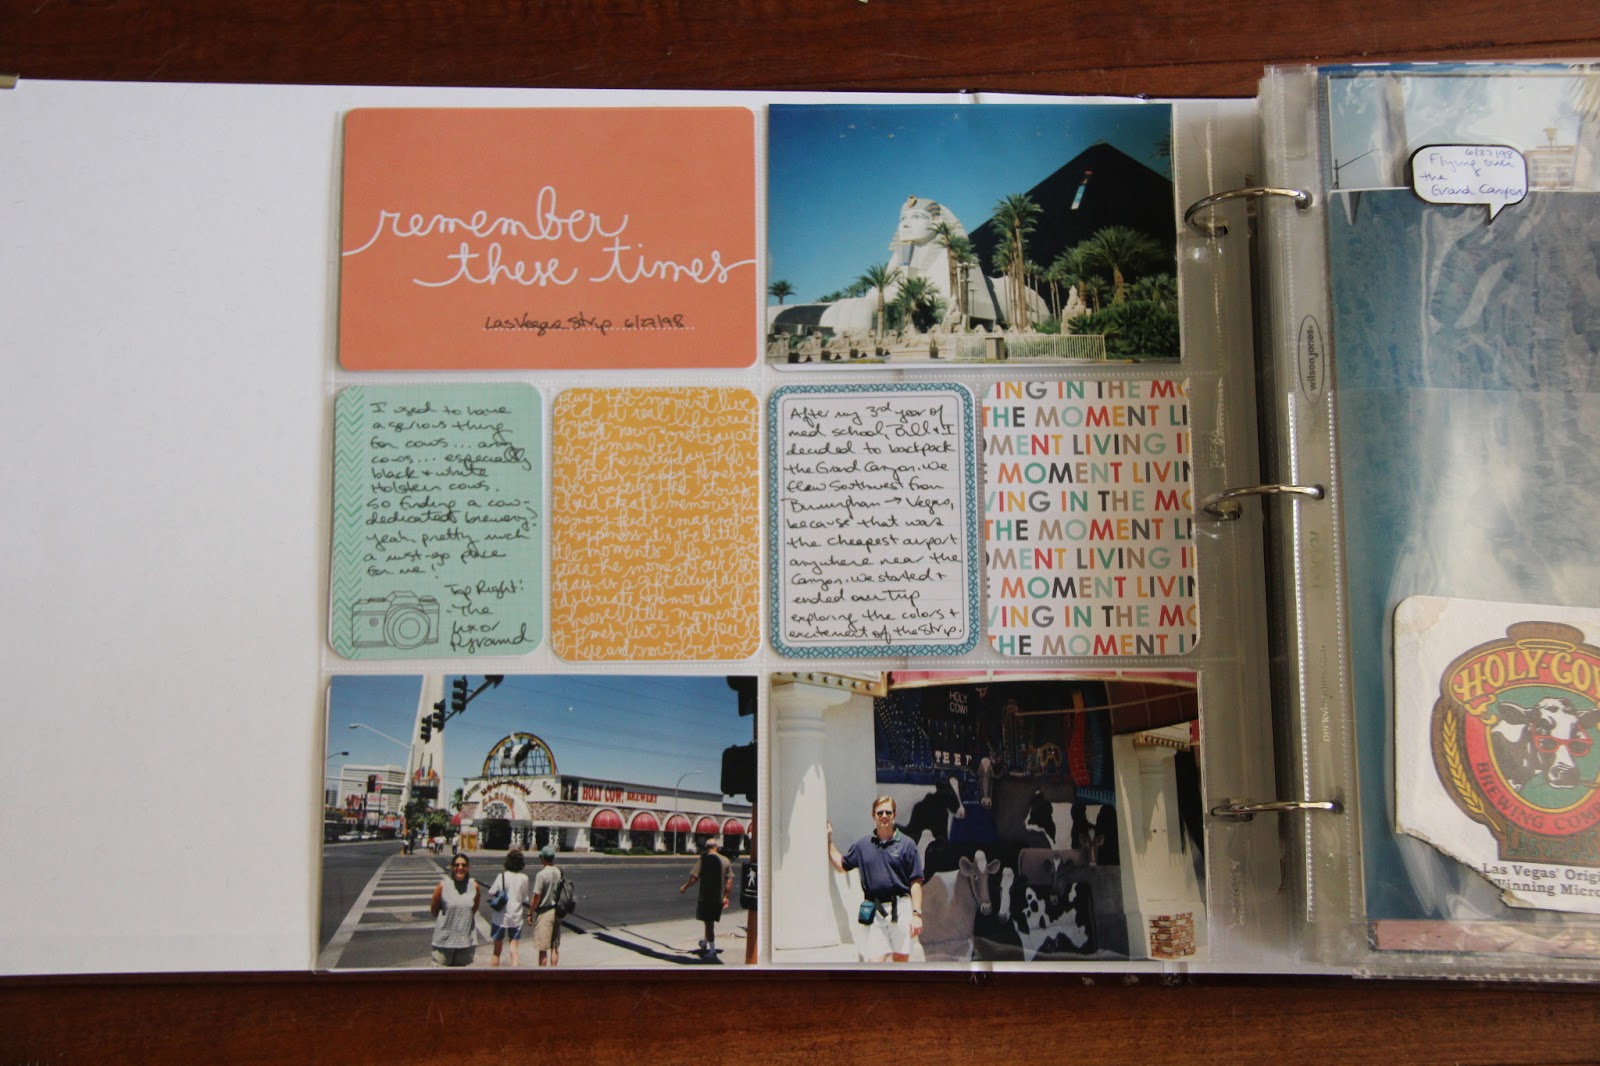
Another way I have recently used Project Life and divided page protectors is to rescue an old album of pictures from a trip my husband and I took to Las Vegas and the Grand Canyon in 1998. I had previously made a scrapbook with these pictures, but I used non-archival products to make it. I didn't know better. All I knew about scrapbooking at that time was those people who cut their photos into cute little shapes and decorated them with cutesy stickers...so not me. I refused to cut my pictures and make paper dolls out of cardstock. The good news? I organized my photos and journalled some of my memories in my book. The bad news? If I didn't 'redo' the album, those pictures and memories still would not have survived. So when I found a set of divided page protectors, I bought them and spent a weekend removing the adhesive from the back of the pictures and memorabilia and sliding them into these photo pocket pages. It was so easy, and I love the results. Even my husband and family have enjoyed the results. Every one of them has gone through my 'new' album and marveled at the improvement. And another perk of using the divided page protectors? Easy...good...design...with no thought required. The designers who created the pages based them on solid grid-based design principles, so you never have to worry about an unbalanced layout.


 I hope this post has inspired you to try out divided page protectors. You may love it. You may not. But either way, you'll have discovered a new way to preserve your memories.

And now, quickly, before I go, I have a few questions to answer:
1. Scrapaholic Mommy asked: how did you do the white stamp is there white ink out that i don't know about LOL???
Answer: There are various brands and forms of white ink available on the market. I've tried several, but my favorites tend to be chalk and craft inks. They tend to be thicker and have a richer color. But I'll let you know a little secret...I rarely actually use the white inks. I cheat. I use clear Versamark ink then emboss them with white embossing powder. Works every time ;)

2. Leslie asked: So Cori, do you have pictures of your completed non-wintry album that you did? I'd like to see it.
Answer: I wish! The album is at ScrapHappy, so feel free to head over there to flip through the album all you want!

Supplies:
- page protectors - American Crafts, WeRMemoryKeepers, office supply store
- journalling cards - Becky Higgins, American Crafts
- label stickers - October Afternoon, unknown

Thursday, April 18, 2013

A Winner, A Challenge, and A Question

Hello, Ya'll!

I have a quick apology to make to everyone. This month has been crazy, insanely busy, so my blog post is running a bit late, which means that I still need to announce the March challenge winner. Please forgive my tardiness.

And now, without further ado...the March winner is...SHARON HUNT! Congratulations! You have won a $5 credit to Scraphappy to spend any way your heart desires! ENJOY!!!

This month's challenge: Use divided page protectors (also known as Project Life, Photo Pocket Pages, etc) to make a layout on any topic you want. You can use any configuration you want and use any papers and embellishments that you want. Scraphappy has a great selection of various configurations available for you to play with, so if you need some, go get them!
Ready? On your mark...Get set...GO!!!

Next, a question for you Lovely Ladies (and any Handsome Gentlemen) who are reading this blog today: I am teaching a beginning Silhouette class at next weekend's Gulf Coast Crop. Do you have any specific topics or questions that you want me to address? What do you want to learn about? Please, let me know. I am still working on my handout, so I can add anything that you want to know.


Saturday, April 13, 2013

The Joy of Creating Art and Scrappy Goodness/Challenged with Cancer Living with Love


On December 10th, 1999 I was diagnosed with cancer in my lymph nodes.  It took until sometime in January until they found it was coming from my breast. I wound up having a Bi – lateral mastectomy in January, then started Chemo in February, followed by Radiation.   Since then it has come back every year and was followed by treatment for about 6 months for each occurrence. In 2010 it spread to my liver, lung and bone. I had been on treatment for over two years straight when on December 10, 2013 I start to feel dizzy and was having what I thought were sinus problems.  Living in Florida there were others that I knew who were also complaining the allergies were starting early this year. I did tell my Oncologist about what was going on as it was getting close for another PET scan. On March 11, 2013 I was very dizzy and in pain, which was a level 10 of 10.  That evening my husband took me to the ER, where they did a CAT scan which showed that the cancer had spread to my brain. They transferred me to another Hospital to see a neurosurgeon. I had an MRI done on Tuesday evening and the doctors told me Wednesday morning that there was more cancer than the CAT scan initially showed.   There were multiple tumors in both hemispheres of the brain and at least five tumors in the Cerebellum. The doctor also explained that the cancer had been in my brain for a while because it was already calcified in some areas. He explained that the operation would be very painful and he was not sure, based on the amount of cancer that the operation would be beneficial.  This was all I needed to hear to make the best decision for myself and improve my remaining quality of life.   Over the years I had seen enough to know this was not how I wanted my life to end. I wanted to enjoy the rest of my life. I had lived longer than I had thought when first diagnosed. I have seen my children marry and I have two grandchildren. The second one was born March 18th, 2013 which put me on a high for a week. Wednesday morning, March 13th, they gave me THREE weeks to live.  It’s has now been FOUR weeks and with a Steroid to control swelling on my brain and medication to control pain I have been enjoying my life, doing the things I want and making Art which brings joy to my soul.  It has been a little challenging since I now shake when I draw and write, though it still brings me Joy.
My saying “Challenged with Cancer, Living with Love” came to me one night. I did not care for everyone telling me to fight. I don’t like fighting, it’s negative and exhausting and I’ve been doing it now for thirteen years. A challenge is something I can take on without feeling negative and heavy.  Now I just want to enjoy the rest of my life and be free.  My decision brings me peace.


Friday, April 5, 2013

Gulf Coast Crop-n-Shop Weekend CLASSES!! :)

ALL CLASSES ARE FIRST COME, FIRST SERVE!! SIGN UP NOW!!If you are not attending the crop but would like to take a class, YOU MUST CALL SCRAPHAPPY AND PRE-PAY FOR YOUR CLASS!! Otherwise, all croppers who sign up for a class, you will pay your instructor the day of. If you decide that you'd rather crop than attend the class on the day of, you will be asked to purchase the pre-made kit.

To sign up, please call Scraphappy at (850) 607-2527 or send us a facebook message. We are open Tuesday-Saturday 10am-6pm.


 FRIDAY, APRIL 26TH CLASS SCHEDULE 10:00 am - CHERRY-O Note Card Set $29
                   By Tina Sutton (CTMH)


In this class you will make this darling note card set.  You will decorate the card box, create dividers for your cards, make 5- note cards with envelopes and create a matching Pen!  WOW… Hi Ho Cherry O!  What a fun project that will make an incredible gift!  Guaranteed to be FUN, FUN, FUN!  Kit includes - card box, Paper, Stickers, Pen, and colored, detailed instructions so you can re-produce the project.  You will need the following items in class- paper trimmer, Bonding Memories Glue, 3 D tape, scissors, adhesive and baby powder.  I will have those items in the booth if you need them.  Can't wait to create with you! 


12:00 pm - "At Home With Nature" Mini Album $34

                   By Rachel O'Crowley (The Robin's Nest)

This is a woodsy type album, great for anything outdoors!
The class will take 3-4 hours. Please bring your basic tool kit!


3:00 pm - Quick and Easy Layout Class 1 $17
                By Lashonda (Blessed by Designs)


*Just added Disney as a theme choice!!!*

Do you need some fresh idea's to help you get more pages done?  In this class we will explore and create layouts for a theme of your choice.  You will be able to choose (1) theme from (4) layout kits.   We will complete 2 (2) page layouts, that will make you want to do more!!!  So join me for an adventure into the world of quick and easy layouts!!!  If you take both layout classes you will receive an extra class kit FREE, to complete another 4 pages.  That is 12 pages in all.  (The FREE KIT is a $17 Value!)  *There will be Door Prizes in this Class*


5:00 pm - My Digital Studio $18
                
By Nicole Gunter (Stampin' Up!)


7:00 pm - TBA
9:00 pm - Basic Gypsy Class (Layout, 3 Themes to choose from) $15

                       By: Teresa Dorr


You don't necessarily need a Gypsy to take this layout class! Just let the instructor know and you can have it cut for you!! Please bring your basic tool kit, and make sure your Gypsy is updated.


SATURDAY, APRIL 27TH CLASS SCHEDULE

9:00 am - Disney Mini Album $27
                
By Lashonda (Blessed by Designs)


Did you take more photo's at Disney than you care to admit?  I truly understand what that is like, I once took over 800 photo's at Disney!!!!  I created this class to help you get some of your photo's out of the box and onto the page.  In this class we will complete a mini album that will help you get over 30 photo's done.  This class is jam packed with fun, adventure, and best of all Ideas!!!! *There will be Door Prizes in this Class*


11:00 am - Coloring with Copic Markers $31
                   By Nancy Kirk (Certified Copic Instructor)

In this class we'll make several cards using stamped images and copic markers for coloring. You will do a little stamping with the primary emphasis on coloring.  If you are new to copic markers I'll spend a little time explaining the color coding system and a few techniques on how to blend the colors.

To get the best results we'll use  Copic X-Press It Blending Cardstock for the coloring layer.   My collection of over 150 copic sketch markers will be available for you to use.  (see note below if you are bringing your own markers). 

Bring:  your favorite adhesive and cutting scissors
Note:  If you are bringing your own copic markers please have them labeled

12:00 pm - Silhouette Class $22

                By Cori Peck (Scraphappy Design Team Member)


1:00 pm - Beach Mini Album $34
                By Rachel O'Crowley (The Robin's Nest)

The front page will be customized for a beach themed mini album! Please bring your basic tool kit!

4:00 pm - Magnetic Tag Mini Box $36

                   By Elsa (JustaFewDesigns)

We'll be using K&Company floral papers to make this beautiful and unique Magnetic Mini Tag Box!  You will need to bring: Basic tool kit, beads/bling, stickles and a scorer.

6:00 pm - 12x12 8-Page Album! $34
                 By Tina Sutton (CTMH)


Come make this beautiful 12 x 12 - 8 page album in just 2 hours.  I will be showing
you how to use CTMH patterns & embellishments together- to create beautiful layouts.
Your kit will include an album ( yes an album ), paper, stickease & a bouquet assortment.  Over $100 value for only $30.00!  WOOHOOO!
Supply List: Adhesive, Scissors, 3 D foam tape, Paper Trimmer


8:00 pm - Cricut Class (Layout Class, you select theme) $15
                        By Teresa Dorr


 You do not have to have a cricut to take this class, just let the instructor know and it will be cut for you. This is a basic how-to class! Please bring your basic tool kit. 


9:30 pm - TBA
SUNDAY, APRIL 28TH CLASS SCHEDULE

9:00 am - Quick and Easy Layout Class 2 $17
                       By Lashonda (Blessed by Designs)


*Just added: Disney theme as a theme choice!!!*
In this layout class we will complete another set of quick and easy layouts that will allow to scrapbook quickly, but witIn this class we will explore and create layouts for a theme of your choice.  You will be able to choose (1) theme from (3) layout kits.   We will complete 2 (2) page layouts, that will make you want to do more!!!  So join me for an adventure into the world of quick and easy layouts!!!  If you take both layout classes you will receive an extra class kit FREE, to complete another 4 pages.  That is 12 pages in all.  (The FREE KIT is a $17 Value!)  *There will be Door Prizes in this Class*

11:00 am - Advanced Gypsy Class (Layout, you pick theme) $15
                  
By Teresa Dorr


You do not have to have a gypsy to take this class. Just let the instructor know and you'll have the layout cut for you. Please bring your basic tool kit.


1:00 pm - My Digital Studio $18
                
By Nicole Gunter (Stampin' Up!)


Thursday, April 4, 2013

Grandma's Handwriting Remembered


My Grandmother had the most beautiful handwriting and taught me the art and joy of the handwritten note. Just seeing her letters just makes me smile. I wanted to find a way to preserve that memory. I decided to create these pages with some recipe cards and a letter that were in my keepsake box.

Since I found this great paper in pink and black dessert script, I decided to use that as my color palette.


Tear both patterned papers diagonally creating random tear lines to drop below the letter. Use a Tim Holtz Distress Ink to the edges to avoid sharp white edges.

Crop some light and dark pink cardstock to frame the photos and the recipe cards. I used both around Grandma’s photo to give it more weight and not have it get lost in the page. Be sure the pinks slip into the black area for better coordination. The recipe card on the black seemed to beg for a little pink bow.


On the black pink cardstock, I again placed the diagonal paper in the opposite direction so the pages appear as a set. Distress the edges like the pink page. The letter was not as yellowed as I wanted so I sponged a bit of Distress Ink on it to soften the white. For some reason, I had a sheet of office supply stickers (you know how that goes) which gave me the clip for the top of the letter. Placing the letter and the picture of my grandparents in a manner that filled the page in, I had one spot that was a bit empty. Digging into my supplies, I found a sprig of tiny maroon flowers to complete the page.

I used black photo corners that I’ve had for years to add to the aged look of both pages. There is always a great variety of paper and cardstock for inspiration at Scraphappy for any project.

 Supplies:
12x12 black Bazzill
12x12 pink glimmer Bazzill
12x12 sheet of sweet patterned paper
12x12 sheet of pink dotted paper
Black photo corners
A bulldog clip sticker
A sprig of little maroon silk flowers
Pink grosgrain ribbon