Upcoming Events that you DON'T want to miss!!

Wednesday, September 26, 2012

Themed Progressive Layout

October Cricut/Gypsy Class     
THEMED PROGRESSIVE LAYOUT
Teresa Dorr  tdorresq@aol.com  850-623-5539.   Find me on Facebook:  tdorrscrapbooker. 


This is a new type of class that uses your Cricut and/or your Gypsy.  
For this class, you can use any size Cricut Machine. 
Supplies You Need to Bring to the Class:

  • 4 to 6 photos that fit the theme:  Beach, Summer, Sun, Pool/Lake/Water Fun
  • 2-12 x 12 patterned paper for base that fit the theme
  • 2 to 3 sheets of solid cardstock
  • 1 font cartridge
  • 1 shape or theme cartridge.

If you don’t have cartridges, there will be plenty to share. 

At the end of the class, you will have a two page layout, complete with your pictures, but there’s a surprise twist:    You won’t be designing the layout, your fellow crafters will each have a hand in creating the layout.

This will also be a timed event, you will have only some much time for each step of the design process.  So bring your creative thinking caps, some photos, paper and your basic toolkit and let’s have some fun!

Friday, September 21, 2012

Fall a Season of Gratitude


We may not have the change of Fall colors yet in Florida, but at Scraphappy you can still choose from the Festive Fall paper line to create whatever your hearts desire.
I could feel fall in the air as I created the cards and candy bar wraps using the Fall and Halloween paper lines. The feeling of gratitude and wanting to say "Thanks".
What better way to say thanks than by giving a handmade item to your family and friends!


Candy bar wraps are great for "just a little something" you would like to give someone.  There are many occasions in which to give that special fall gift:  going to a friends for dinner, meeting someone for lunch, a "thank you", Halloween treats for the grandchildren, a favor for an event, or just for that someone special. There are so many Pretty stickers, flowers, ribbons and papers you can choose from at Scraphappy to make it your Special creation.

Stop by Scraphappy to see the full Fall and Halloween Collection.

Supplies Used:
Tim Holtz ~ distress paper, distress markers, distress pads, Scissors
Flower Shoppe*~ Juliana, Belle
Fundamentals ~ Tags
Karen Foster Design ~ Celebrate Fall Collage
Lawn fawn ~ Happy Haunting
Bazzill ~ Basics, Spook & Kooky
Tattered Angels ~ spray mist
American Crafts ~ paper trimmer
Zots
Sakura ~ Gelly Roll clear star
Glossy accents

Come on by Scraphappy this fall and let Christy and Stephanie show you the other assorted papers, ribbon and twine used.

Friday, September 14, 2012

Aging a Vintage Scrapbook Page

Do you ever get great ideas when you see a patterned paper but it is not quite right for what you have in mind? My Mind’s Eye has a great line of papers and I found this to be the case with this great hive design. It was so intriguing that I just had to do something with it.
I started digging through my treasure trove of old photos and came across a really old photo of my mom and a cousin when they were children. It was so charming and I could see it working with the paper. But it the paper just didn’t look old? Some papers are vintage friendly even if the shading is not quite right. By using a background sheet of neutral pewter colored Bazzill as the base paper, the gold was toned down a bit.
Once I decided on the first photo, I realized that I had one of my grandmother and aunt as children and then one of my grandmother and grandfather as young adults. By copying the other photos in sepia or black and white, the correct tones can be achieved and they all seemed to go together. I lightly rubbed the edges of the photos with a sponge dabbed in a brown ink pad to take the white paper look off. Tim Holtz Distress inks are great for this, lots of cool brown tones.
To bring out the gold from the paper, I mounted the photos on a coordinating gold cardstock and arranged them in a nice pattern. This page shows a three photo grouping nicely. Once the photos were in place, I looked and found some blank areas. A light sanding in several spots around both papers and taking a sponge in the same light toned aging ink over those spots to take the shine off and help match the golden tones even further.
I had a “  “ set of stamps with some wonderfully, quirky stamps that was giving me some trouble deciding what to do with them. They were great but not center stage type designs. By stamping them into the design of the paper, they found a place to shine. Tiny words set into the hive and random hives in the background to further align the patterned sheet with the base page. These great turquoise butterfly rub-ons gave a bit of contrast to the gold and pewter.
You can stop by the shop to see more detail on this new favorite page of mine. Find a great sheet of patterned paper, some old photos and whatever odd stickers or rub-ons to get you started.
I just love these crabby little girls, my grandmother and her sister, who apparently did not want the picture taken. So they could be next. I have to find the perfect paper and then...  

Friday, September 7, 2012

REFERRAL CARD CONTEST!!

~ Referral Card Contest ~

We wanted to say THANKS for all of the great word-of-mouth advertising that we receive from
you all.. so we decided to reward you for your efforts!

Until OCTOBER 20th, you can stop by Scraphappy and pick up 10
Scraphappy Referral Cards.
(yes, you may come and get more whenever you run out!)

What do you do with these referral cards, you ask?
You give them out! They must be given out to a
NEW customer OR someone who has not yet visited our newest location!


Each referral card comes with a 25% OFF Coupon, as well as a spot to put YOUR name.
Whenever we receive the card, it'll enter you into the contest!
Whoever has the most entires on October 20th WINS!

Refer your non-crafty friends by telling them that we have pre-made gifts-to-go, that we offer classes & that we offer scrapbooking services (i.e. we can scrapbook their photos).

The winner will receive a 4-day crop pass!! That's a $100 value!
..We might even throw in a couple of random drawings throughout the contest for some other awesome prizes! ;)..

Tuesday, September 4, 2012

End of Summer with Shoreline

Hello World!

How was your summer? Any days at the beach? Any fun travel? Any good family time? Any time to play? And now the important question...Any time to scrap? The last time I was in the store, Christy gave me some of American Crafts' Shoreline papers to play with, and WOW, they are perfect for bright, happy summer events (or anything else bright and happy you may want to use them for). The colors are uber-saturated reds, blues, and yellows with some dark hot pinks and pool blues to accent. I have had the most fun scrapping with these papers, hoarding every little bit and piece to tuck here and there as color bursts on other projects.

I was blessed this summer with the opportunity to go with my father on a medical mission trip to Peru. At the end of the trip, we spent a day touring Machu Picchu. The Shoreline bright yellow sunburst pattern screamed 'Incas' to me, so I used it as the background for this layout about how much we climbed that day. I used some old kokopelli stamps I had in my stash to stamp on some canvas in teal, then stamped the words in black over the person kokopelli. I added some Mini Market letters from October Afternoon and some brads to finish off the page.
This next layout is about a shopping excursion I took with my daughter last month. We were separately scavenging a clothing store for clothes to try on. When we met up in the dressing room, we had both picked the same dress! Obviously, as a scrapbooking mom, this had to be documented on my cell phone so a layout could be made. If you look at the layout, and think about my typical style, you'll notice that I am a B-side scrapper. I prefer the backsides to most patterned papers. They tend to be more subtle, less busy patterns that recede into the background more than their typical trendier, bolder A-sides. This shopping layout uses almost all B-sides.
And then we come to my last layout for today. I made the background of this layout by spraying various colors of yellow and green spray mist onto shiny white cardstock then blending them with a paper towel. The sunshine embellishments were cut out from a separate sheet of Shoreline paper, as was the strip at the bottom and the 'sunshine' label.
I hope you've been inspired to pull out your summer pictures and spend some time creating. If you want any of the Shoreline papers, go see ScrapHappy and stock up! I think I might be needing some more for my own stash...Maybe I'll see you there?

Supplies:
- American Crafts - patterned paper, Thickers
- letter stickers - October Afternoon, Lily Bee Studios
- spray mists - Studio Calico, October Afternoon, Tattered Angels
- disco starts - Heidi Swapp
- wood veneer stars and camera - Studio Calico
- chipboard stars, brads, teal stamping ink, canvas fabric

Tuesday, August 21, 2012

Doing the Work for You!!

Do you ever come across a great piece of patterned paper, that has a fun scene already printed on it?  Most of the time I'm not really sure how to use these paper, because I am so used to cutting my 12x12 sheets into smaller sizes.  Last time I was in the store, Christy gave me some of the Hello Spring Line from Little Yellow Bicycle, which included a 12x12 sheet that had the cutest little tree pre-printed on the page.  I just knew I had to use this piece as my background page and still found a fun way to design my page around it!  And the great thing about this type of background paper, is that it takes a lot of the work out of designing and putting your page together, so you can get it done quickly and easily!!


Of course, I still have those unscrapped holiday photos that are always floating around.  These are from this past Easter and when I saw the great colors in this line, I knew it would go along perfectly with these photos.  I wanted to add my own touch to the background paper, even though I was keeping it in tact, so I used one of the Studio Calico Mistery Huey's Masks and some Mister Huey's Spray Mist to add a little more interest to the background.  The photo strip was a perfect way to add my photos without covering that cute little tree and it also left me with plenty of room on the right had side for my title and journaling.  I love to mix alphas in my titles, so I used some of the fun, textured American Crafts Thickers that Christy has in the store.  You definitely need to pick these up!!  The font is so fun and I love the dark pink to almost purple color of these Thickers.  I also used a fun little scalloped piece off of one of the other papers and thought it made a nice border of "Easter Eggs" across my page!

So even though it's August, if you're like me you probably still have photos from this past Spring to get to...or maybe photos from 10 Springs ago!!  :)  Make sure you stop by ScrapHappy and pick up some papers from the Little Yellow Bicycle Hello Spring collection and grab a pack (or 2) of the great textured Thickers too!!

Friday, August 17, 2012

Be "SPOOKTACULAR"


Be "SPOOKTACULAR" this Halloween with these fun treat ideas using the Lawn Fawn "Happy Haunting" stamp set.

Lawn Fawn's Happy Haunting stamp set, Tim Holtz Distress Marker Set, Tim Holtz Halloween Haunts Kraft Resist paper, Tim Holtz & Ranger Distress collection, My Mind's Eye- Haunted Accessory Street, watercolor tag, ribbon were used to create this Candy/Gift Card holder and Tag. 
*I thought the tag could be used and a place card with their name and the stamps left for them to color.

Bazzill card stock, American Crafts paper line by amy tangerine, Lawn Fawn's Happy Haunting stamp set, Tim Holtz Distress Markers, water brush and ribbon were used to create this treat holder for a bottle
.
*The gator aide bottle with Treat Holder would be great for the kids as a Halloween treat or party gift.
Or even as a Teacher gift! This treat holder has so many possibilities. Stop by Scraphappy to see the other treat holders on display.

Bazzill card stock, American Crafts paper line by amy tangerine, Lawn Fawn's Happy Haunting stamp set, clear tube, ribbon were used to create this Witches Hat treat.

*This is a fun treat holder! Not only will the kids love it, I think the teachers or co-workers will as well.
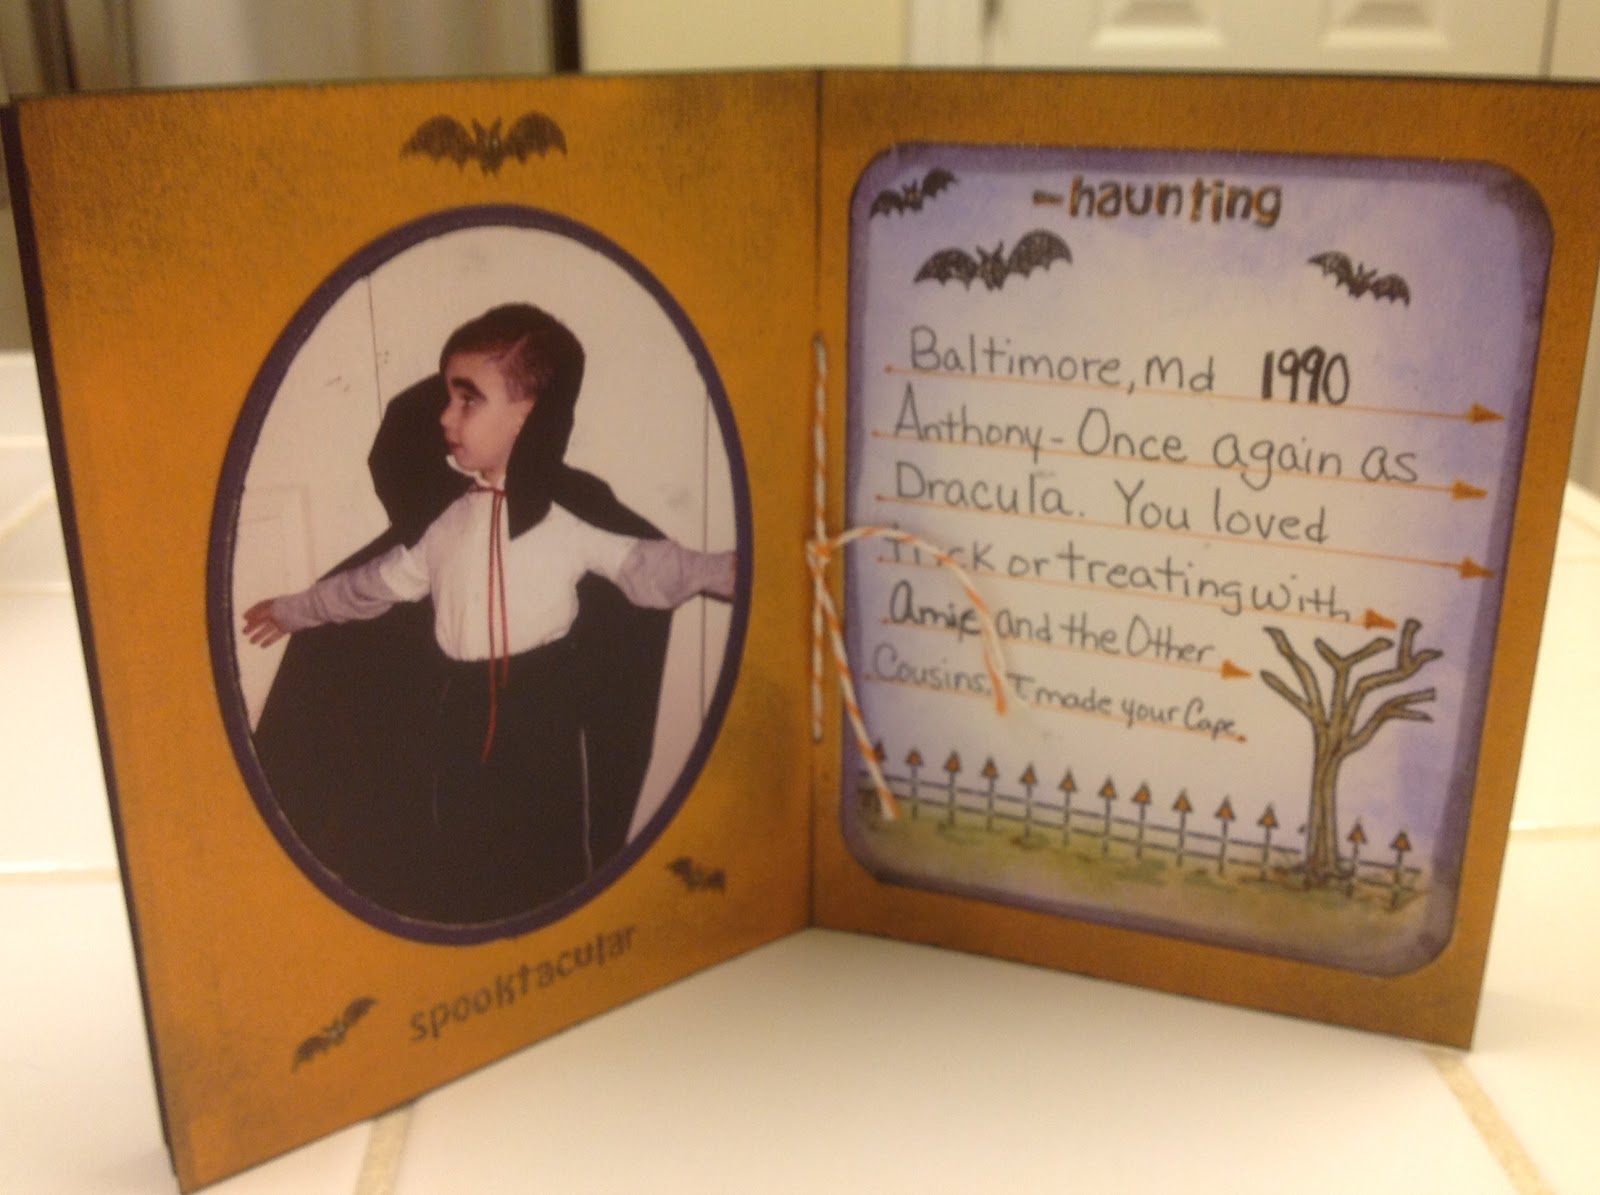
Bazzill card stock, Tim Holtz - Halloween Haunts Kraft Resist paper, Distress collection card stock, Distress Markers & Distress pads, American Craft's paper line by amy tangerine, Lawn Fawn's Happy Haunting stamp set, Gelly Roll - clearstar pen, Precision Pen - American Craft, Twine were used to create this Halloween Mini Card Album.


 In creating the Halloween Mini Card Album I thought it would be nice as a favor for a child's party by just using the stamps and again left for the children to color. It would also be nice to leave a space for a photo that could be taken with an instant camera.


 Other supplies used:
Tim Holtz - distressing tool, scissors
Glossy accents
Scoreboard
Zots
American Crafts adhesive foam tabs
American Crafts paper trimmer  -I love this trimmer. The scallop cartridge is my favorite.

All the products used to create these Halloween creations are sold at Scraphappy.
 If not in stock they can be ordered.
**Note: Clear Tubes are sold at Scraphappy - 10 for $6.00

I had so much fun creating these Halloween creations, I hope you enjoyed them.
If you have any questions, do not hesitate to talk to Christy or Stephanie.